Creating Android Applications using Gatsby and Capacitor with Splash and App Icon

For creating an Android Application from the Gatsby website there is one easy way by using Capacitor. Here is a step-by-step implementation for creating an android application with a splash screen and app icon.
Note that We need Android studio for creating an app and build an APK file.
First, We need to add a capacitor library to our gatsby website by using npm or yarn.
yarn add @capacitor/core
yarn add @capacitor/cli
Next, we have to initialize capacitor in our website by following the command
yarn cap init
Then, It asks for the App name and Package Id. For example,
Appname: Brisktech
packageID: com.brisktech.app // Follow this format
After submitting this Android folder and capacitor.config.json file is created. In the capacitor.config.json file, we have to change the following thing
webDir: “www” to webDir: “public”
Then, We have to build the project. Keep in your mind that If you change anything in your project, you have to build the project because the capacitor uses a public folder to create an app. For build project use
gatsby build
Or equivalent command to your website.
After that, we have run the following command to configure Android App.
yarn cap add android
yarn cap sync
yarn cap update android
yarn cap copy android
Then we need to open Android by following the command.
yarn cap open android
In Android Studio in the Run menu click "Run App" and test your App and for the build apk file open the Build menu and select "Build Bundle / (APK)s".
Create Icon and Splash
For creating Icon and splash screen we required images as following dimensions.
Icon - requires a 1024x1024 png file (transparency allowed)
Splash - requires a 4096x4096 png file (no transparency) with the important stuff centered
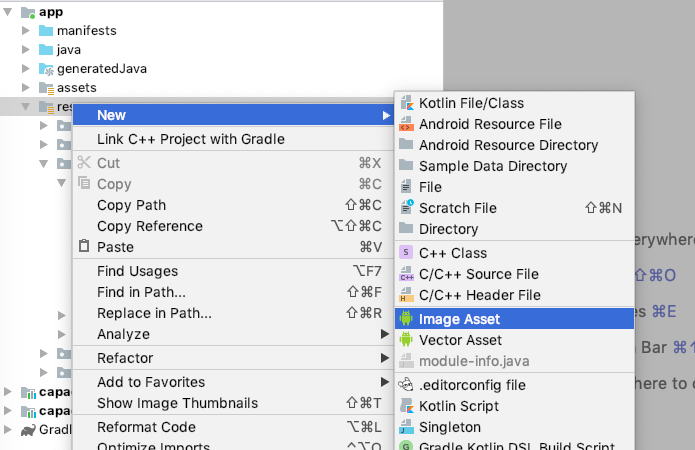
Now, For Icon Right-click on the res folder, New → Image asset.

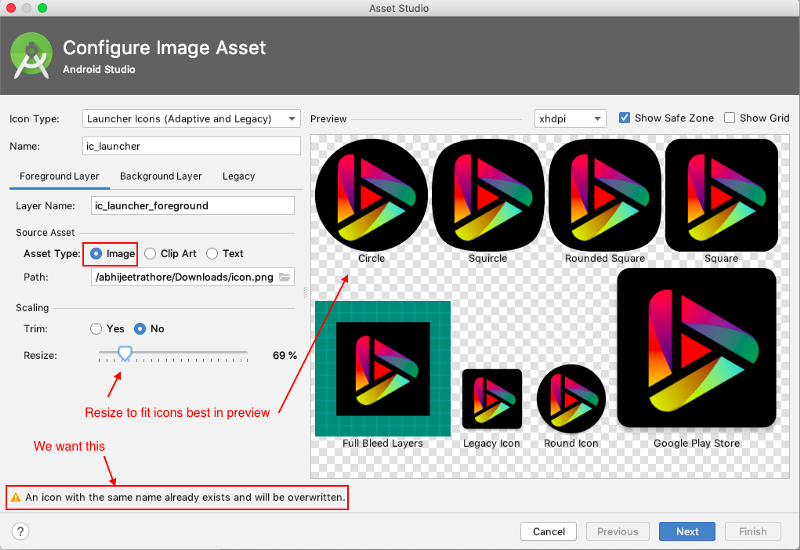
It will open another window, where you can select your icon image, and check previews of the icon. Finish the operation, and it will overwrite the existing icon files.

Next, For Splash Screen generate splash images using basic splash image using a tool,
https://apetools.webprofusion.com/#/tools/imagegorilla
Now, In Android Studio you have to replace the splash files manually in each folder. Splash files found in Android/res/drawable/splash.
A better way to see these files is to change the top menu option to Project Files. You’ll now see the splash folders in app/src/main/res.
You can replace this splash.png with the downloaded assets, keeping in mind the mdpi, hdpi, etc. resolutions.
Note: When replacing, please take care that the folder and file names remain the same.
Then you have to change the capacitor.config.json file
"SplashScreen": {
"backgroundColor": "your color"
}
Then You have to do some changes to Android Folder as the following,
Change values for "AppTheme.NoActionBarLaunch" in app/src/main/res/values.xml file,
<style name="AppTheme.NoActionBarLaunch" parent="AppTheme.NoActionBar">
        <item name="android:windowNoTitle">true</item>
        <item name="android:windowActionBar">false</item>
        <item name="android:windowFullscreen">true</item>
        <item name="android:windowContentOverlay">@null</item>
        <item name="android:windowIsTranslucent">true</item>
 </style>
Then test it by running the application.
Interested in working with us?
Let's Connect